Monday, December 31, 2012

Paleo/gaps Chicken Nuggets

Chicken nuggets are comfort food, they remind me of my childhood. Usually they are covered in eggs, gluten, and hydrogenated oil. These ones are smothered in ghee and rolled in coconut flour with tasty seasonings. Bake them for 15 minutes, broil them on low a little longer until the tops have browned and they are ready to eat.

 Dip a piece of chicken into some melted ghee. Adding diced garlic to the ghee gives the chicken nuggets even more flavor.
 
 Roll the piece of chicken in coconut flour that has been seasoned with sea salt, cumin, and Italian seasoning. Feel free to use other herbs/spices instead.
 
 Place the chicken nuggets on parchment paper that has been placed in a pan. I greased the parchment paper with ghee, and after a few batches have found that isn't necessary.
 
 Steam broccoli and carrots while the chicken nuggets are baking. Make sure to smother them in ghee before eating as well :-)
 
Enjoy!
 
 
Ingredients
  • 1 lb free range chicken thighs
  • 1/3 cup ghee, melted
  • 2 cloves garlic, diced
  • 1 cup coconut flour
  • 1/2 tsp sea salt
  • 2 tsp's cumin
  • 1 tsp Italian seasoning
Directions
  1. Preheat the oven to 375 and place a piece of parchment paper on a large cookie sheet.
  2. Chop the chicken thighs into 2-3 inch strips.
  3. In a small bowl melt the ghee and mix in the diced garlic.
  4. Pour the coconut flour, sea salt, cumin, and Italian seasoning into a medium bowl and whisk together.
  5. Use tongs or your fingers and roll a strip of chicken in the ghee. Then roll it in the coconut flour mixture until it's well coated. Set the chicken nugget on the cookie sheet. Repeat this step until all of the chicken is on the sheet leaving a little space in between each nugget.
  6. Bake for 15 minutes, then broil on low until the nuggets have browned up a bit.
  7. Remove from the oven, let cool and enjoy!


Wednesday, November 21, 2012

Ghee, how to make it and why it is healthy

When butter is melted down and the milk solids are removed the oil leftover is known as ghee, clarified butter, or butter oil.

Often times, people with milk allergies can tolerate ghee. This is because there is no lactose or casein in ghee when is properly made. This is true for me, dairy upsets my stomach and flares up my eczema. But I don't have any issues with ghee.

One nice thing about ghee is it has a long shelf life. After it can be kept in the cupboard for several months. You don't have to worry about it going rancid like butter. It will be semi-solid at room temperature but still soft enough to scoop out with a knife and spread onto food. It can be kept longer in the fridge but it will firm up and difficult to scoop out.

Ghee is perfect for high temperature cooking. It won't burn like butter because the milk solids are gone. It has a much higher smoke point than extra virgin olive oil so it's a better option for frying. When olive oil is heated past 350-375 free radicals are released and act as carcinogens when consumed.

It's much cheaper to make your own than to buy it. Ghee comes in tiny little bottles and is rather expensive at stores. Take a little time to melt some butter and save your money. When purchasing butter make sure it's organic from grass fed cows. Chemicals, antibiotics, and hormones are stored in fat, so factory farmed cows often have toxins in their milk.

Ghee from healthy cows will have a deep yellow color. This indicates that it is very nutrient dense. It also has vitamins A, D, E, and K, antioxidants, and butyric acid (anti-cancerous).

The saturated fat found in ghee is good for our heart, brain, bones, and immune system. Saturated fat actually raises HDL cholesterol and protects the heart. Calcium can't get into our bones without the help of saturated fat, so it can help prevent osteoporosis. Our brains need fat and cholesterol to function properly. Finally, saturated fats have antimicrobial, antifungal, and antiviral fatty acids that keep our immune system strong.


 Melt grass fed butter on med-low heat in a heavy bottom sauce pan. Once foam has risen to the top turn the heat down to low and carefully scoop off the foam
 
 let it simmer on low for about 15 more minutes, or until the milk solids have turned a light brown and sink to the bottom of the pan.
 
 Let the ghee cool for about 10-15 minutes and prepare a glass jar, a funnel, and cheese cloth. I prefer to use a nut milk bag instead of a cheese cloth because the mesh is even smaller.
 
Pour the ghee through the cheese cloth into the jar. It should be a deep yellow color without any milk solids. Let it cool completely before putting the lid on, then keep it in your cupboard or fridge. Use it for frying, baking, add to steamed veggies, or put a spoonful into your morning oatmeal. It has a wonderful rich flavor that is good on anything!  


Sources Include: The Weston A. Price Foundation, Mary Enig, Sally Fallon, and Dr. Mercola.

Thursday, November 1, 2012

Battling GMO's

Genetically Modified Organism's have been in the news lately. California is trying to get them labeled (crossing my fingers they do), and there are petitions going around in many states tyring to get them labeled as well. The Non-GMO Project has tons of information that is well worth reading.

Reasons to avoid gmo's.
  1. They have never had standard testing done to see if they are safe for human consumption
  2. They have been shown to be harmful in animal studies
  3. Most gmo's are paired with an herbicide that is linked to several health problems
  4. The future consequences of gmo's are not yet known
  5. Monsanto control's 90% of genetically engineered crops. It's never good for one person/company to have complete power over our food.
  6. Those that produce gmo's threaten farmers and silence scientists, because they don't want the truth about them to come out
  7. Farms can be safe and sustainable without gmo's.
I thought I had created a gmo free kitchen. When shopping I buy locally grown and organic as much as possible. I've been avoiding any companies that have given money to support gmo's. It's pretty easy to remember the big brand names, but it can be harder to remember the "natural" brand names that are owned by these larger companies.

It may only contain peanuts but it is owned by Smuckers....

The other day I saw a jar of Adams peanut butter in my fridge. It's labeled as all natural and the only ingredient is peanuts. Out of curiosity I emailed Adams to find out if they use or support gmo's. Here was their response:

"In recent years, agricultural science has developed and grown crops using modern biotechnology techniques in an effort to produce a higher quality, more economical and dependable food supply. The U.S. Food and Drug Administration, the U.S. Department of Agriculture, and the U.S. Environmental Protection Agency have determined that existing “biotech” foods are safe and do not differ in any meaningful way from other food.

Due to the expanding use of biotechnology by farmers and the commingling of ingredients in storage and shipment, it is possible that some of our products may contain ingredients derived from biotechnology. We believe that safety is an important issue. We support continued evaluation of the best methods to assure safety and we encourage discussion by all interested parties with respect to developing appropriate means to assess its risks and benefits. We also support a more rigorous and transparent regulatory process. Internally, we utilize a cross-functional team to monitor and evaluate developments in biotechnology and advise senior management of the impact to Adams®.

You can be assured that we will continue to manufacture the safe and high quality products you have come to expect. If you should have further questions or need additional information, please visit us at www.adamspeanutbutter.com.

Yeah....a simple yes or no would have sufficed. Nothing like getting the ol' run around. I went and looked at the jar again and down at the bottom I saw that it is owned by Smuckers. This is a large company that has given money to support that gmos don't get labeled. Time fore me to find a better peanut butter company, Yikes!!

When I called CB's Nuts and asked them if they use gmo's I was answered with a simple no. Then I was invited me to come to their store and sign a petition to get gmo's labeled. This is the kind of company I want and will support. Another plus is that they are located here in Washington.

CB,s Nuts. Local and made without gmo's! 
*Note: I took this photo from google images.*


Monday, July 9, 2012

Salmon Cakes (egg free)


Growing up, my dad always made delicious salmon cakes for a simple dinner or lunch. After playing around in the kitchen, I've finally found an easy, nutritious, and very delicious version. This one's a keeper!


Ingredients:
  • 15 oz cooked salmon
  • 1/2 cup onion, diced
  • 2 cloves of garlic, diced
  • 1 carrot, finely grated
  • 2 Tablespoons of parsley, diced
  • 1 Tbs ground flax seed or psyllium husk powder
  • 1/2 tsp salt
  • 1/4 tsp pepper
  • 2-3 Tablespoons of melted coconut oil or ghee
  • Sliced lemon on the side when serving

Directions:
  1. Preheat oven to 350 and place parchment paper on a cookie sheet
  2. Mix the salmon, onion, garlic, carrot, parsley, flax meal, salt, and pepper in a bowl. If the mixture isn't sticking together, add some mashed avocado, it will hold it together.
  3. Use a measuring cup or large spoon to scoop out about 1/4 of a cup of salmon cake mixture.  
  4. Place onto the cookie sheet, then push down and form the pattie. Keep them at least 1/4 of an inch apart.
  5. Drizzle the coconut oil on top of the salmon cakes and bake for 20 minutes, then turn the broiler on for about 5 minutes to brown the top sides.
  6. Serve with lemon slices and avocado wedges.


This recipe is also on Real Food Wednesday,  Kelly the Kitchen Kop's site.

Wednesday, February 22, 2012

Raising Dieter

Shay is a fellow food enthusiast who does a great job taking care of her family. When she's not in the kitchen whipping up enticing/healthy food she enjoys quilting, making crafts, reading, and spending quality time with her beautiful family. Her adorable son Dieter has food allergies and she does a wonderful job sharing what has/hasn't worked when it comes to keeping him healthy and happy. Many parents struggle with their kids food allergies and she does a great job at keeping her family balanced and healthy. Check out her blog Raising Dieter for more allergy tips! 


Here is her story:

"I noticed Dieter's eczema when he was five months old. He was also vomiting more frequently around that time. I took him to a chiropractor that specialized in the NAET treatments. He tested allergic to corn, soy, dairy, gluten, and refined sugars. I started the treatments and I ended up going a couple of times a week for 7 months! During that time his allergies kept getting worse and worse. Any new thing he came in contact with he was allergic to: rubber, plastic, latex, bananas, apples, tomatoes, polyester, olive oil, pineapple, the list goes on... His skin looked terrible and he was still vomiting. I finally stopped the treatments and took him off of everything. We (I was still breast feeding at the time) had a pretty simple diet. Our main food was rice, beans, and potatoes. Most fruits and vegetables were okay. Dieter was on that diet for a year and still couldn't have most foods. Something had to change! His skin was still breaking out and he couldn't hardly eat anything! One night, I happened to find a blog that talked about the GAPS diet. I ordered the book and started Dieter on the diet the week after the book arrived. My whole family needs to start on the diet.

I have learned a lot since my son was allergic to everything. I have bought grains that I never new existed: quinoa, millet, amaranth. His allergies today are soy, corn, dairy, gluten, refined sugars, and tree nuts. Before finding the GAPS diet, I was compiling a binder with good wholesome recipes. Now with the GAPS diet I have more to add! My family is going back to the basics: homemade, whole foods." 

Wednesday, February 15, 2012

Almond Flour

I make almond flour after I have made almond milk. After I have blended the almonds and squeezed the milk out through a nut milk bag I have leftover pulp. Since the almonds have already been soaked to make the milk all I need to do is dehydrate them. Simply spread the pulp out on a baking sheet and stick in the oven at 150 degrees for a few hours or place it in your dehydrator. Once it is dry I give it a quick buzz in my food processor and it's ready to use!

Strain the soaked, blended almonds through a nut milk bag. Squeeze out the milk and save the pulp.

The pulp should have as much liquid expelled as possible.  

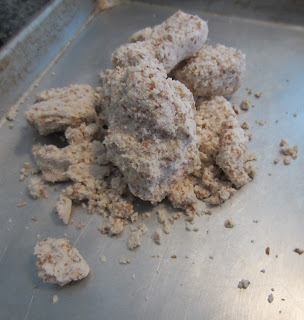
Spread the pulp onto a baking sheet or in a dehydrator. Keep the temperature on low until it is completely dry. 

Give it a quick blend in a food processor or blender and it's ready to use! 


Find other great recipes like this on Real Food Wednesday

Wednesday, February 8, 2012

Creamy Almond Milk

I don't tolerate dairy well, so I make my own nut milks. For extra creamy and rich milks I add a can of full fat organic coconut milk. If you are worried about saturated fat, don't be. When it's coming from a healthy source like coconuts it is actually quite beneficial for your health.

Unrefined coconut oil is known for it's antimicrobial/antifungal properties, so you can give your immune system a little boost. It will also aid in weight loss, and the absorption of calcium, magnesium, and amino acids. If you have any thyroid or gall bladder issues this is the easiest fat for your body to metabolize. More info on coconut oil HERE.

Soak 1 cup of nuts in salt water for at least 7 hours to remove the phytic acid. 

Rinse and drain the nuts and put them into a blender. Add 4 cups of filtered water.

Blend for about 1 minute (probably less if you have a blendtec or vitamix).  

Pour into a nut milk bag with a container underneath to catch the milk.  

Squeeze the bag until all the milk has been extracted. At this point you should have about a quart of milk. You can stop here and store the almond milk in the fridge or add the coconut milk to make it extra creamy.

The remaining pulp should be pretty dry. Save this because you can dehydrate it. Then you have home made almond flour.  

blend or whisk in 1 can of organic coconut milk. Be sure to use regular full fat, not light.

Pour the milk into glass containers and store in the fridge for up to 7 days. Be sure to give the jar a little shake before using, as the milk will start to separate as it sits in the fridge.

Ingredients:
1 tsp sea salt
1 cup raw almonds (or other nuts/seeds)
warm filtered water (for soaking)
4 cups filtered water (for blending)
1 can full fat, organic coconut milk

Directions:
  1. In a large dish add the nuts, salt, and pour warm filtered water over them until the nuts are covered. Stir to mix in the salt. Let the nuts soak for at least 7 hours. 
  2. Discard the soaking water then rinse and drain the nuts. Place the nuts into a blender along with 4 cups of filtered water. Blend for about 1 minute. 
  3. Pour the mixture through a nut milk bag into a bowl or pitcher. Gently squeeze the nut milk bag to extract the milk from the pulp. The pulp can be dehydrated into a nut flour. At this point there will be about 1 quart of milk which can now be stored in the fridge. 
  4. For an extra creamy milk blend or whisk in 1 can of full fat, organic coconut milk. 
  5. Pour the milk into glass containers and store in the fridge for up to 7 days. Be sure to give the jar a little shake before using, as the milk will start to separate as it sits in the fridge. 

Monday, January 30, 2012

Soaked Granola, GF

I have always enjoyed granola. Unfortunately what you buy at the store is highly processed and full of high fructose corn syrup. Most of the recipes for home made granola are still full of phytic acid because the grains need to be soaked first. Some even call for canola oil or have you bake the nuts/seeds in the oven at high temperatures. Then you just end up consuming rancid fat, which is toxic to your body. So here is my recipe for a properly prepared granola.

Some great reasons to eat buckwheat: Help lower blood sugar, cholesterol, and blood pressure. It is high in fiber and magnesium. Contains high quality proteins.It has antioxidants that protect the body from free radicals.

Some great reasons to eat oats: Help lower blood sugar and cholesterol. They are full of heart healthy antioxidants. They have plenty of selenium, manganese, magnesium, zinc, and phosphorus.

It can either be dehydrated or baked in the oven at 200 degrees

Granola without any additional nuts, seeds, or dried fruit.

Granola with soaked/dehydrated walnuts, dried cranberries, and raisins.

Keep it stored in an airtight container to stay fresh! 

Soak:
4 cups rolled oats
1 cup buckwheat
1 3/4 cups filtered water
2 Tbs apple cider vinegar

Add before baking:
1/2 cup melted unrefined coconut oil
1/2 cup raw agave or honey
1/2 cup pure maple syrup (grade B)
1 Tbs cinnamon
1/2 tsp sea salt
1 tsp vanilla 

Directions:
  1. The night before mix the oats and buckwheat together with the water and vinegar in a large bowl.
  2. In the morning preheat the oven to 200 degrees and prep two large baking sheets with parchment paper. This can also be made in a dehydrator. 
  3. Melt the coconut oil in a small pot and whisk in the rest of the ingredients.
  4. Pour the coconut oil mixture onto the soaked grains and use a spatula to gently mix them together.
  5. Scoop the wet granola onto the two baking sheets and evenly spread the mixture out.
  6. Put in the oven and bake for 4 hours. Be sure to stir  the granola every hour and rotate the baking sheets.
  7. When it's done store in an airtight container. Add dried fruit, nuts, seeds, or coconut flakes if desired. 
Find more great recipes and tips over at Kelly's blog during Real Food Wednesday!

Saturday, January 21, 2012

Soaked GF Whole Grain Bread

I've been making and messing around with gf breads for a looong time now. Finally, I've come up with a recipe that is easy, healthy, tastes great, and seems more like whole wheat bread than gluten free. There is no need to have the "right" flours because I've used a lot of different gf flours and had great results every time. I use 3/4 a cup of 4 different flours. Make sure to use 3/4 cup of tapioca flour and the other 3 can be whatever you like or have on hand. I've used a mix of brown rice, quinoa, sorghum, millet, teff, and garbanzo bean and the bread has always turned out.

Reasons why you want to soak your grains (as well as seeds, nuts, and beans).
1. Phytic acid is found in all grains, seeds, nuts, and beans. Phytic acid combines with calcium, magnesium, phosphorus, sodium, and zinc in the intestines and blocks your body from absorbing them. So you're not really getting all the nutrients you think you are when you consume whole grains!
2. The lack of absorption can lead to mineral and bone loss because these nutrients will be taken from your body instead of supplied to your body.
3. Soaking the grains will break down and neutralize the phytic acid. We are then able to properly digest the grains and use the nutrients.
4. Water should be mixed with some lemon juice, apple cider vinegar, whey, or yogurt to effectively break down the phytic acid.
5. Sprouting grains, dehydrating them, and grinding them into flours don't need soaked because the sprouting process already broke down the phytic acid. To save time you can buy sprouted flour. However it's cheaper to do it yourself!

I participated in Real Food Wednesday, go there to find more great recipes!

Parchment paper makes the removal of gf bread super easy

This was a blend of Teff, Sorghum, and Brown Rice


No more dry and stiff gf bread, this one has flexibility to it!


Ingredients:
  • 3/4 c brown rice flour
  • 3/4 c teff flour
  • 3/4 c sorghum flour
    • Note: the above 3 flours can be switched to whatever gf flour you like! 
  • 2 c filtered water
  • 2 tsp apple cider vinegar
  •  
  • 2 large eggs 
  • 1/4 cup olive oil
  • 1 Tbs sugar
  •  
  • 3/4 c tapioca flour
  • 2 Tbsp active dry yeast
  • 1 Tbs xanthan gum
  • 4 tsp baking powder
  • 1 tsp salt


Directions:

  1. The night before, use  a large bowl whisk together the brown rice flour, teff flour, and sorghum flour. In a small bowl mix the 2 cups of water with 2 tsps of apple cider vinegar.  Pour the vinegar water into the  flours, mix well and let soak overnight
  2. Next, whisk together the eggs, sugar, and olive oil together.
  3. In a small bowl whisk together the tapioca flour, yeast,  xanthan gum, baking powder, and salt.
  4. Pour the yeast and egg mixtures into the bowl with the soaked flour. Stir them together with a hand mixer. Then add the rest of the dry ingredients and beat for 1 minute. Add more tapioca flour if runny.
  5. Preheat the oven to 375 degrees and line a bread pan with parchment paper and grease the paper and pan. Scoop the dough into the pan and smooth the top with a spatula. Brush some olive oil onto a piece of plastic wrap and cover the top. Set aside in a warm place to rise for about 40 minutes or until it has doubled in size.
  6. Bake for 40 minutes or until it has a nice brown color. Let it sit for 5 minutes, then remove and place on a towel to cool.